I decided to do my final project as a persuasive message for the implementation of Web 2.0 tools.
The process has been grueling yet somehow I still enjoyed it. Tired from late nights, an energetic puppy and a husband recovering from surgery, I am posting a link to my Final Project for ETC. The central statement for my project is WEB 2.0 Tools - Get to Know It, The World is Living It.
Take look...<click here>
Melissa
Monday, February 28, 2011
Friday, February 18, 2011
PE4_VFTNetworksSocialLearningSystem

This is my third day with the VTF/KHAKI Social Learning System. I've run through the Procedures I put in my RILS and I'm ready to give it a test run with a Learner. Are you ready for this???? Hang on ... I'm going to do a run through and capture it with ScreenFlow so you can see it. >> click here
Well, as you can see...I didn't get the ScreenFlow video to load. You'll just have to come back for the 2 minute version I'll be doing for next week's assignment.
PE3_VFTNetworksSocialLearningSystem
This is my third tool review and I believe its benefit originates in the best of both previous tools. Click this link for the features of this free web 2.0 social learning system by The Vignettes For Training Company (VTF Networks) called TrainingPayback. I found this tool by accident as I was perusing the online version of Training Magazine. I've been catching quite a few FREE webinars through their site, live and recorded. That is how I discovered the Saba suites. I also found a link there for the tool I am now reviewing.
I drafted my RILS plan two days ago and decided I needed to build in some content to work with as I learn the concept of the VTFNetworks tool. Interestingly, I could easily be referring to this tool as the Khaki Blended Learning Solutions Social Learning System. The tool is so customizable that you wouldn't know that Khaki isn't the originator of this social learning system.

The folks at VFTNetworks have put together a user-friendly product. There are links to videos (vignettes) for each of the functions that give a brief narrative of the reason for the function followed by instruction. I'll be incorporating links to these videos for the Learners that will be piloting my RILS.
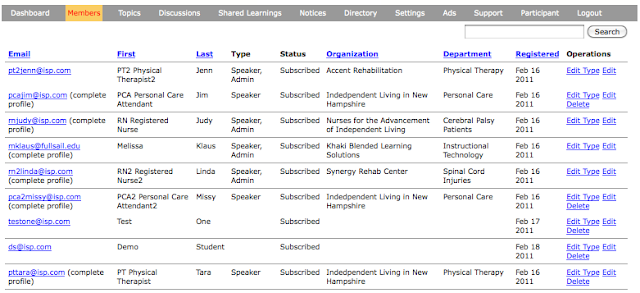
Yesterday I set up a demo within the system including Profiles for members; 2 Registered Nurses, 2 Physical Therapists, 3 Personal Care Attendants. One of the RN's is a Consultant, the other is a Speaker. One PT is a Speaker and one is a Member. Speakers and Consultants have Administrative privileges.
Members
I've created three Discussion Groups; Types of Disabilities, Assistive Technology and cerebral palsy NOT by Choice. The latter was created under the RN Judy Profile and she will be the Moderator for that Group. The first Discussion Group in the list, Welcome to discussions, contains links to the related video training vignette within the tool that discusses Discussions.
Discussion Groups
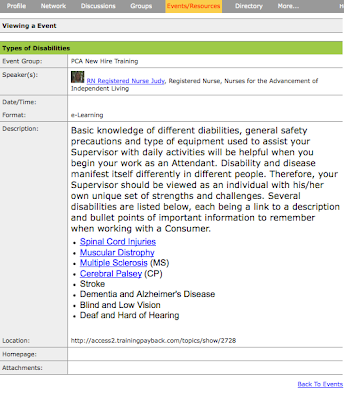 Content is found in the Event/Resources screen where you create, search and view training modules. I created two Events within the PCA New Hire Training Topic Group. Look for topics of interest in the Events/Resources window.
Events/Resources

Access an Event from the Events/Resources screen. The Description in the Event screen contains the content including links to documents, a home page and downloadable attachments. The Learners that demo my RILS will print attachments and/or screen captures in each of the features they access. The collection of printed documents will serve as a job aid when the Learners return to implement the Social Learning System.
Resources
I also created Networks between myself and some members. I should be able to look at the Networks that have been created by clicking on the View Sociogram button but all I get is a thinking computer with no Sociogram. Am I finding holes in this tool or don't I have a full access version? Hmm... Let's keep movin' on.
I drafted my RILS plan two days ago and decided I needed to build in some content to work with as I learn the concept of the VTFNetworks tool. Interestingly, I could easily be referring to this tool as the Khaki Blended Learning Solutions Social Learning System. The tool is so customizable that you wouldn't know that Khaki isn't the originator of this social learning system.

The folks at VFTNetworks have put together a user-friendly product. There are links to videos (vignettes) for each of the functions that give a brief narrative of the reason for the function followed by instruction. I'll be incorporating links to these videos for the Learners that will be piloting my RILS.
Yesterday I set up a demo within the system including Profiles for members; 2 Registered Nurses, 2 Physical Therapists, 3 Personal Care Attendants. One of the RN's is a Consultant, the other is a Speaker. One PT is a Speaker and one is a Member. Speakers and Consultants have Administrative privileges.

I've created three Discussion Groups; Types of Disabilities, Assistive Technology and cerebral palsy NOT by Choice. The latter was created under the RN Judy Profile and she will be the Moderator for that Group. The first Discussion Group in the list, Welcome to discussions, contains links to the related video training vignette within the tool that discusses Discussions.
Discussion Groups

Events/Resources
Resources
Monday, February 14, 2011
BP7_OneMinuteVideo
I chose to use one of the movie trailers in iMovie for this project to do a one minute commercial for the web 2.0 tool I have been researching. Working within the limits of the formatted template was slow going at first because I had to get video footage for the movie. I downloaded, viewed the tutorial and tried using ScreenFlow but I was having trouble controlling when the video would stop. Ultimately, I prepared slides in PowerPoint, saved each screen as a movie loop then imported the PPT .mov to iMovie. Unfortunately, PowerPoint for Mac doesn't seem to have the same control over your text animation as other PC versions I have used. I wasn't able to put any special effects through PowerPoint but my choice of template took care of that for me.
Hope you enjoy the results.
Here's saba...<<click the link
Hope you enjoy the results.
Here's saba...<<click the link
Saturday, February 12, 2011
PE3_iMovie
This is my final post for my iMovie Practical Experience activity. The tutorial winds things into a tight package by including a separate video for exporting, sharing, publishing and finalizing your project as well as a few other helpful hints.

There are many ways to get your movie out into the world. They all start with the Share menu and you choose your path from there.

You should publish to the highest quality size available. You'll need to have an account on YouTube to publish there. When you publish your movie to your MobileMe Gallery you have options to password protect the file, hide the movie on your Gallery home page and allow your movie to be downloaded. When exporting to iTunes you'll get to choose mobile, medium, large, HD720p and HD1080p viewing output. The options showing are based on the original resolution of your video.
When you return to the Project Window you'll see icons in the upper left of the screen indicating the movie has been shared and where.
Something important to remember is this. If you are going to move your movie project to another hard drive and continue editing, the drive must be a Mac formatted drive. If it's not and you want to format it just select the drive from the Finder window on your Mac, click on it and select Erase. Also, remember not to click and drag your project to the other disk. This will COPY the file. You must hold the command/apple key while your are dragging in order to MOVE the project. If your clips are being used in other projects you'll want to choose Save Project and Events so you have all the necessary clips for each project.
Well, that wraps it up. So, are you ready to see what I've created? Ok, here's the YouTube link...<<click here
And now that I have completed this training not only do I have a professional and fun way to share my ideas, I've received a Certificate of Completion to hang on my wall.

Friday, February 11, 2011
PE2_iMovie
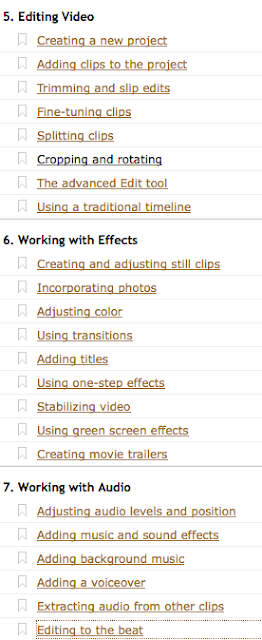
The next three sections of the online iMovie tutorial cover editing video, working with effects and working with audio. This is the bulk of what you have available to make your project look it's best. Look at the menu items shown for the specific topics covered.
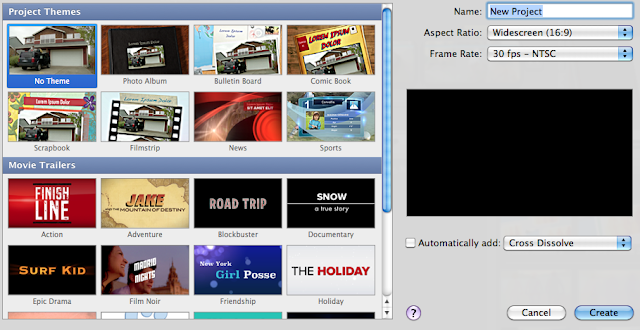
Before you can begin editing you've got to assemble the content. Create a New Project, give it a name, select the Aspect Ratio and Frame Rate and choose a Project Theme. iMovie has 32 themes to choose from including No Theme which is like working with a blank sheet of paper.
The Aspect Ratio is how your project will be output and should be the same as the original footage. Standard Frame Rate for footage shot in North America is 30 frames per second (fps). In Europe the standard is 24 fps.
Click and drag the clips you want to use into the Project Window and you're ready for editing. Some, or more likely, most of your clips will need editing. They'll have footage you'll want to delete and manipulate to get the movie looking clean and slick. iMovie allows you to trim clips so you eliminate those shots of the sky or the blurred and dizzying effect caused by unfocused camera movements. This is done with two features; trimming and slip editing.
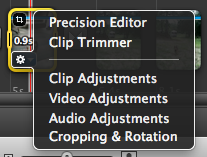
Trimming will let you choose the good frames in the clip and get rid of the rest. It's important to do your editing in the Project Window so you don't change the original, unless you are certain that you want to replace the original with the trimmed version in your Event Library. In that case, edit in the bottom half of the window
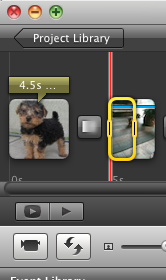
Slip editing is used when you want to keep a clip at a certain duration. It allows you to choose a section of footage and move it within the clip. Slip editing is best done in the Clip Trimmer because it allows for more accuracy.
 The blue dot represents the edit point you are currently editing. Move the line with the blue dot while viewing the clip in the viewer window to precisely mark where the clip should end. When you've got the clip trimmed precisely where you want it, click Done.
You may want to stick a photo or a piece of footage in the middle of a clip for a special effect. Just click the first part of the clip and drag to the point where you want the insert. Choose Clip the Split Clip and your clip will be split. Next, go to the Event Browser, select the footage or photo you want to insert and drag it between the two pieces of the split clip. If you change your mind, split clips can be re-joined by positioning them next to one another, choose Clip from the menu bar, then select Join Clip.
Transitions help smooth out the jump between clips and can add some flair to your iMovie. There are 24 transitions available to choose from but for professional results you should stick to the Cross Dissolve and Fade Effects transitions. Fades are good for the beginning and end of your project. Choose the effect you want to use and drag it to the space between the clips you want to transition. A transition icon will appear in the place where the transition will occur.
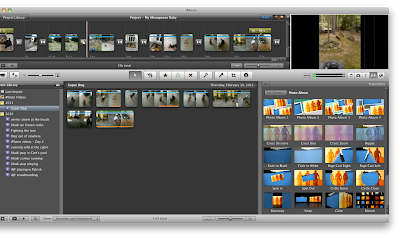 iMovie '11 has a new feature that allows you to super-impose a clip over a clip. It's called the Green or Blue Effect. One clip has to have a blue or green background with the subject you want to superimpose over the clip with the scenery. The subject cannot have any blue or green on them or they will not appear on the superimposed image.
iMovie '11 also has an option to create movie trailers. They're easy and fun templates that include many of the editing features along with built-in music and credits. You just stick in your clips according that match the labels in the template and you're ready to go.
One of the most frustrating but fun parts of this tutorial and iMovie creation is the sound. iMovie allows you add music and sound effects to help set the mood and tone of your piece. There are hundreds of sound effects to choose from right through iMovie but you can import your own if they are .mp3 or .aac files.

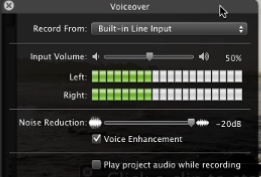
You can also extract audio from your own clips and add a voiceover.

If you have a clip with audio you want to use in another project, select the portion of the clip you want to take the audio from, press the command/apple key and click and drag the clip to where you want the sound to be inserted. Make sure you look at the bottom of the Project window to see how far into the clip you are placing the new audio. You'll have to grab the right length of audio to fit.
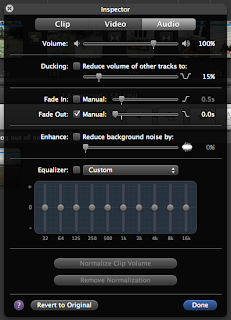
Audio clips can be edited with the visual graph that shows up below the clips when you click the audio wave button. You'll see the name of the audio file and a graph of its volumes below the clip it is associated with. Move the graph objects around to adjust the volume, length and location of the clip.
Some audio adjustments are done from the Inspector window. Adjust Volume, Fade and Ducking. Ducking is similar to slip editing in that the clip's volume will be lower when there is an overlap with another track. You can adjust how high or low you want it to be. There's also an option to Enhance your Voice. Try it and see if you like the effect.
 One last feature I want to share with you is Editing to the Beat. You can synch video clips, photos and titles to specific points in your audio tracks. First, add audio to the Project window and click Audio Clips in the Action Menu. Choose Clip Trimmer. You'll see your audio clip's wave form at the bottom of the window. Figure out where you want beat markers and click on those areas in the wave form. Then right-click or CTRL-click and select Add Beat Marker. A tiny dot is inserted in the place where the beat marker occurs. Alternatively, you could press the "m" key while listening to the track to place to beat markers. Click View then Snap to Beats. This is a fun feature because you can add photos to a project and synch them to the beats.
Next post I'll be wrapping up the iMovie tutorial and my iMovie project.


Before you can begin editing you've got to assemble the content. Create a New Project, give it a name, select the Aspect Ratio and Frame Rate and choose a Project Theme. iMovie has 32 themes to choose from including No Theme which is like working with a blank sheet of paper.
The Aspect Ratio is how your project will be output and should be the same as the original footage. Standard Frame Rate for footage shot in North America is 30 frames per second (fps). In Europe the standard is 24 fps.

Click and drag the clips you want to use into the Project Window and you're ready for editing. Some, or more likely, most of your clips will need editing. They'll have footage you'll want to delete and manipulate to get the movie looking clean and slick. iMovie allows you to trim clips so you eliminate those shots of the sky or the blurred and dizzying effect caused by unfocused camera movements. This is done with two features; trimming and slip editing.
Trimming will let you choose the good frames in the clip and get rid of the rest. It's important to do your editing in the Project Window so you don't change the original, unless you are certain that you want to replace the original with the trimmed version in your Event Library. In that case, edit in the bottom half of the window
Slip editing is used when you want to keep a clip at a certain duration. It allows you to choose a section of footage and move it within the clip. Slip editing is best done in the Clip Trimmer because it allows for more accuracy.

You may want to stick a photo or a piece of footage in the middle of a clip for a special effect. Just click the first part of the clip and drag to the point where you want the insert. Choose Clip the Split Clip and your clip will be split. Next, go to the Event Browser, select the footage or photo you want to insert and drag it between the two pieces of the split clip. If you change your mind, split clips can be re-joined by positioning them next to one another, choose Clip from the menu bar, then select Join Clip.
Transitions help smooth out the jump between clips and can add some flair to your iMovie. There are 24 transitions available to choose from but for professional results you should stick to the Cross Dissolve and Fade Effects transitions. Fades are good for the beginning and end of your project. Choose the effect you want to use and drag it to the space between the clips you want to transition. A transition icon will appear in the place where the transition will occur.
iMovie '11 also has an option to create movie trailers. They're easy and fun templates that include many of the editing features along with built-in music and credits. You just stick in your clips according that match the labels in the template and you're ready to go.
One of the most frustrating but fun parts of this tutorial and iMovie creation is the sound. iMovie allows you add music and sound effects to help set the mood and tone of your piece. There are hundreds of sound effects to choose from right through iMovie but you can import your own if they are .mp3 or .aac files.

You can also extract audio from your own clips and add a voiceover.
If you have a clip with audio you want to use in another project, select the portion of the clip you want to take the audio from, press the command/apple key and click and drag the clip to where you want the sound to be inserted. Make sure you look at the bottom of the Project window to see how far into the clip you are placing the new audio. You'll have to grab the right length of audio to fit.
Audio clips can be edited with the visual graph that shows up below the clips when you click the audio wave button. You'll see the name of the audio file and a graph of its volumes below the clip it is associated with. Move the graph objects around to adjust the volume, length and location of the clip.
Some audio adjustments are done from the Inspector window. Adjust Volume, Fade and Ducking. Ducking is similar to slip editing in that the clip's volume will be lower when there is an overlap with another track. You can adjust how high or low you want it to be. There's also an option to Enhance your Voice. Try it and see if you like the effect.

Next post I'll be wrapping up the iMovie tutorial and my iMovie project.
STAY TUNED....
PE1_iMovie
This week I'm getting acquainted with iMovie, a Mac application that I'll use to create several videos over the next couple of weeks and into the remainder of the program. I'm excited to learn this program because I've had an interest in movie editing for a long time. When I design training programs I like to incorporate a movie to demonstrate the information that's being taught in the class. So many of us are visual learners and movies, when properly scripted, directed and edited can have a huge impact on the learning that is achieved in the classroom.
My movie is going to be about my 10 month old puppy Khaki. I've got a few videos of her on my iPhone that I'll import and I hope to show you what a fun and energetic girl she is and how she has grown into a well mannered pup. I named my movie "My Menopause Baby" with tongue in cheek, as they say, because I never had children and having her around is the closest I have come to being a Mom.
I am working through an online tutorial to learn the functions of iMovie as I create this biographical piece. I'll be putting some screen shots of the course content menu so you can see exactly what is covered in the tutorial and shots of my activities as I create my movie. When I'm finished I'll post the video for you to see.
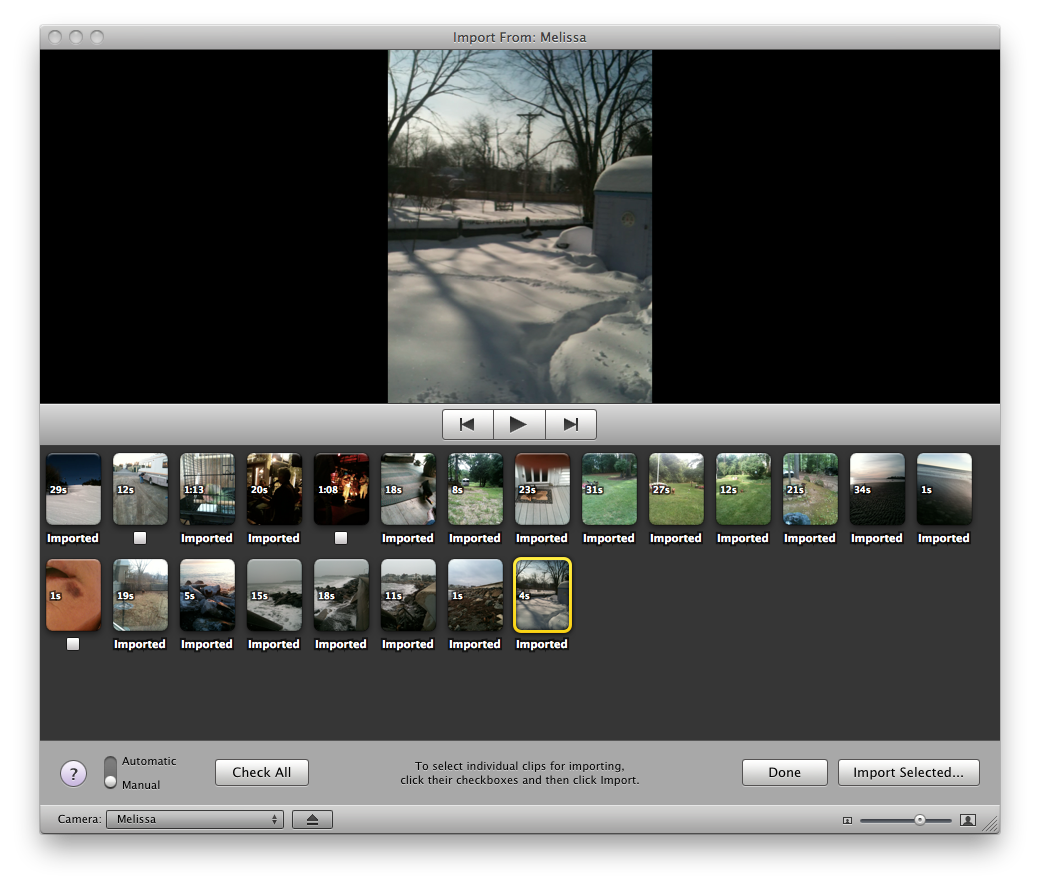
The first 57 minutes of the tutorial goes over how to import content from various image and video capture equipment, navigating the software's interface and organizing the video clips and pictures so they can easily be located for use in the movies you create.

Here's what it looks like when you're importing video from your source equipment. In my case, it's coming from my iPhone but you can import from almost any source. iMovie doesn't recognize window .wmf or .avi videos so those will need to be converted to a .mov, .mp4 or .dv file format that iMovie can read. QuickTime 7 Pro converts files to the .mov format.
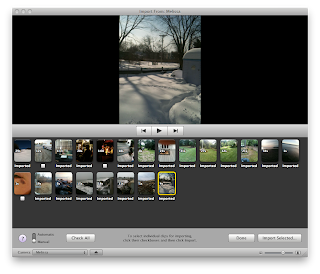
The top window is the Project Window and that's where you put together the pieces of your video. Each piece, or clip, is called an Event. All Events appear in the Event Window in the lower half of the Project Window on the left side. It's like a directory listing based on the date the clip was shot. Rename the Events in so you know what each one contains. You'll move events to the Project Window at the top of the screen to build the content of your iMovie. Choosing events is as easy as click, drag and drop to the Project Window.
 As with most files, you must organize them to be efficient in your work. iMovie lets you organize your events first by giving them a Rating; they're either a Favorite or a Reject. Rejects get discarded to a temporary file that you can go back to and retrieve from if necessary.

Another way of organizing the content is by giving them Tags with keywords that put them into something similar to a category. Keywords are customizable and allow you to search based on the criteria you define. So, if you have footage from your vacation you'll tag it so you can easily located that footage in the future. Just select the clip then click the key icon in the toolbar. A Keywords dialogue box appears and select one or more keyword that describes your clip.


Next post I'll cover the editing features of iMovie.
My movie is going to be about my 10 month old puppy Khaki. I've got a few videos of her on my iPhone that I'll import and I hope to show you what a fun and energetic girl she is and how she has grown into a well mannered pup. I named my movie "My Menopause Baby" with tongue in cheek, as they say, because I never had children and having her around is the closest I have come to being a Mom.
I am working through an online tutorial to learn the functions of iMovie as I create this biographical piece. I'll be putting some screen shots of the course content menu so you can see exactly what is covered in the tutorial and shots of my activities as I create my movie. When I'm finished I'll post the video for you to see.
The first 57 minutes of the tutorial goes over how to import content from various image and video capture equipment, navigating the software's interface and organizing the video clips and pictures so they can easily be located for use in the movies you create.

Here's what it looks like when you're importing video from your source equipment. In my case, it's coming from my iPhone but you can import from almost any source. iMovie doesn't recognize window .wmf or .avi videos so those will need to be converted to a .mov, .mp4 or .dv file format that iMovie can read. QuickTime 7 Pro converts files to the .mov format.
The top window is the Project Window and that's where you put together the pieces of your video. Each piece, or clip, is called an Event. All Events appear in the Event Window in the lower half of the Project Window on the left side. It's like a directory listing based on the date the clip was shot. Rename the Events in so you know what each one contains. You'll move events to the Project Window at the top of the screen to build the content of your iMovie. Choosing events is as easy as click, drag and drop to the Project Window.


Another way of organizing the content is by giving them Tags with keywords that put them into something similar to a category. Keywords are customizable and allow you to search based on the criteria you define. So, if you have footage from your vacation you'll tag it so you can easily located that footage in the future. Just select the clip then click the key icon in the toolbar. A Keywords dialogue box appears and select one or more keyword that describes your clip.


Next post I'll cover the editing features of iMovie.
Thursday, February 10, 2011

Wednesday, February 9, 2011

BP4_Centra
For my 2nd Web 2.0 tool review I chose Saba's Centra, a real-time and archive collaborative engine for e-meetings, virtual classes and webinars. But Centra is just the tip of the iceberg. Saba also offers People Systems Solutions; four product suites that include learning, collaboration, performance and strategic people processes. Tools for nearly every department, managers and employees, from training and performance improvement, to research and development and human resources all working together as an enterprise-wide solution. Saba Live, another member of the Saba family, is a business networking piece that harnesses the power of collaboration with enterprise-wide social media-type profiles and widgets that are accessible in each of the aforementioned suites. Centra is the driving force that puts the power in these products yet it is simple, sweet and user-friendly, Are you starting to get a feel for the scope of this tool? Saba's product line is truly a Web 2.0 masterpiece of resource and human capital management. For the sake of this post I will limit the presentation to Centra’s features and benefits.
In short, Centra manages online communication. It supports channels such as YouTube, Vinio, Dyna and more, and any video format out there. Just bring it! Conferences are streaming or recorded and you can have conversations in a Twitter-like environment. It allows the user to create, manage and enroll in meetings, events and recordings as well as create and edit their profile. Content and Events can also be managed directly from the Home screen. Let's take a look at the engine that drives the Saba beast.
In short, Centra manages online communication. It supports channels such as YouTube, Vinio, Dyna and more, and any video format out there. Just bring it! Conferences are streaming or recorded and you can have conversations in a Twitter-like environment. It allows the user to create, manage and enroll in meetings, events and recordings as well as create and edit their profile. Content and Events can also be managed directly from the Home screen. Let's take a look at the engine that drives the Saba beast.
The Home page is clean and direct. It provides access to all the components of this product. There were a few features that were not accessible in the demo but there's still plenty to see.
Keep reading by clicking the Read More link on the left side below the screen shot.
Keep reading by clicking the Read More link on the left side below the screen shot.

Monday, February 7, 2011
BP2_Nicenet
 Nicenet is a free web 2.0 tool with a simple to use interface that allows class creation, remote log-in, and collaboration. The instructor begins by clicking "Create a Class" on the Nicenet homepage.
 Immediately after a user name and a name for the class is created the system responds with a Class Key. The instructor gives the Class Key to students to access the class and uses the Class Key to access the course for creation and editing. In the example below the name of the class title is "A demo of Nicenet."
 Students are registered for the class when they "Join a Class" using the option on the home page at http://nicenet.org then enter the Class Key.
Wednesday, February 2, 2011
BP3_iGoogleScreenShots
Today I set up my Personal Learning Environment (PLE) to organize all of my information. It's like creating a file for a topic and adding it to a file cabinet. I've used iGoogle to create different tabs for subject areas that I'm interested in then I customized each tab with a theme and gadgets. There are thousands of gadgets to choose from and I'm sure I'll be making changes, adding links and organizing each tab as I collect information resources. Does anyone know how to change the color of the tabs? I've captured each of the tabs I created so you can see what I'm talking about.
Tuesday, February 1, 2011
BP1_Welcome to my blog
This week starts the first class in my Education Media and Design Technology Masters Certificate program. I got a new MacBook Pro, a new email address and a ton of seriously cool, but intimidating, state-of-the-art software applications. As a technology lover I should be in heaven! If I could just get my Hotmail Calendars and iPhone and iCal working with my MobileMe account I would feel a lot more at ease. Don't want to miss an assignment or an appointment....
 I'm learning my way around the Mac but as I said to the MobileMe tech I chatted with for 3 hours last night, I can't wait to get rolling but right now my wheels are square and I am sitting on the side of the road. Even though I have computer experience and a degree to prove it, I am still struggling. This experience has been a gentle reminder to never make assumptions about what someone knows. We have all walked a different path to get to where we stand right now. Without collaboration we would exist in solitude and ignorance.
 I'm learning my way around the Mac but as I said to the MobileMe tech I chatted with for 3 hours last night, I can't wait to get rolling but right now my wheels are square and I am sitting on the side of the road. Even though I have computer experience and a degree to prove it, I am still struggling. This experience has been a gentle reminder to never make assumptions about what someone knows. We have all walked a different path to get to where we stand right now. Without collaboration we would exist in solitude and ignorance.
Subscribe to:
Posts (Atom)